Introduction
Thank you very much for choosing our application. We truly appreciate and really hope that you'll enjoy our script!If you like this script, Please support us by rating us 5 stars (Rate us Here)
KachaBazar - React Next Js eCommerce Solution
Used Technologies
- React.js
- Next.js
- Vite
- Tailwindcss
- Node.js (Express.js)
- MongoDB (Mongoose)
User Panels
- Admin Panel
- Store Frontend
Core Features
This is a complete eCommerce template built with React, Next.js and Tailwindcss with Rest API integration. This template is backend ready and it's built with node, express, and uses MongoDB for the database. We did all schema validation for saving data.Here is some core feature of this project
- Complete Full-Stack Project with backend integration.
- Dynamic translation on all dynamic data.
- Product Attributes and Combination.
- Staff CRUD(Create, Read, Delete, Update).
- Product CRUD(Create, Read, Delete, Update).
- Category CRUD(Create, Read, Delete, Update).
- Coupon CRUD(Create, Read, Delete, Update).
- Setting for controlling admin and store.
- Controlling customer orders.
- PWA Added.
Need Support?
If you have any questions about the script, please sent a email to us aislam270@gmail.comInstallation
To run react project you will need couple thing to setup first, Install Node version v18.18.2. if you already not installed. download from Here
NPM Packages:
- After downloading the template, unzip it
- Open the VS Code Terminal/System Terminal
- Go to the folder (backend): (cd path/to/template)
- Run: npm install, it will install all used packages for this backend.
- Make sure that there is no error.
After the npm packages are installed, make sure that you have a package.json file and check that you have the below lines under the scripts.
    "scripts": {
        "dev": "nodemon api/index.js",
        "start": "node api/index.js",
        "production": "NODE_ENV=production nodemon api/index.js",
        "test": "echo \"Error: no test specified\" && exit 1",
        "data:import": "node script/seed.js",
        "product": "node script/product.js"
        },
-
Rename
.env.exampleto.env -
Configure your MongoDB database. Watch this video on
MongoDB
. After configuring, you will find a MongoDB URI. Put that URI
in the
MONGO_URIvariable in your.envfile. -
The
JWT_SECRETis a random value used for creating a secret token. You can use any value, but make sure it remains secret. -
You need an email and password for email verification and the
"forget password" option. Use an email address
that you want to send messages from when users register or
request to reset their password. We used Nodemailer and the
default email server for this. Watch this video to create an
app password
for your email. After that, put your email in the
EMAIL_USERvariable and the app password in theEMAIL_PASSvariable in your.envfile. Also, make sure you allow less secure apps to be ON and set up CAPTCHA for production environment. See this documentation for more details. Doc -
When you run on live server use
Admin and Store live URL for
STORE_URLandADMIN_URLvariables. And When you run on the local server, usehttp://localhost:3000andhttp://localhost:4000.
After configuration you .env file will look like this
    PORT=5055
    MONGO_URI=your mongodb uri
    JWT_SECRET=alamsfdfsdfsdfsdrafdar!@#$0dlfgjgsdfdsfdsfds
    JWT_SECRET_FOR_VERIFY=lfjfjasjfr09ri09wrilfdjdj
    SERVICE=gmail
    EMAIL_USER=your email //change with your sender email
    EMAIL_PASS=your email app password //change with your email app password
    HOST=smtp.gmail.com
    EMAIL_PORT=465
    STORE_URL=http://localhost:3000
    ADMIN_URL=http://localhost:4000
Importing Demo Data
Once you successfully connect with MongoDB and configure the
.env file, run
npm run data:import. It will execute
the seed.js file and import all demo
data into the database. Make sure to change the demo data in the
utils folder according to your needs. Use a real staff email for
testing the "forget password" option. If
everything is okay, the backend configuration is done, and you
will find all the demo data in your MongoDB database.
Running the Backend
Now run npm run dev to start your
backend on the local server with PORT 5055 or the PORT you have
specified.
Installation
As you already installed Node on you machine, so no need to re-install again, Just check you installed properly by node --version
NPM Packages:
- After downloading the template, unzip it
- Open the VS Code Terminal/System Terminal
- Go to the folder (store): (cd path/to/template)
- Run: npm install, it will install all used packages for this store.
- Make sure that there is no error.
-
Rename
.env.exampleto.env.local -
Please watch this video for Cloudinary configuration
Cloudinary configuration,
doc
(We used Cloudinary for profile image upload).
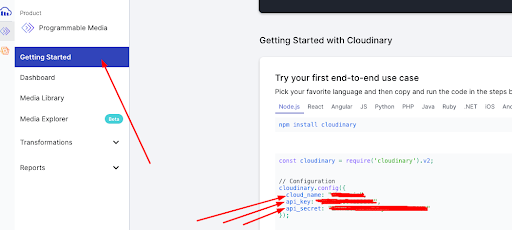
Get your cloud_name,api_key and api_secret
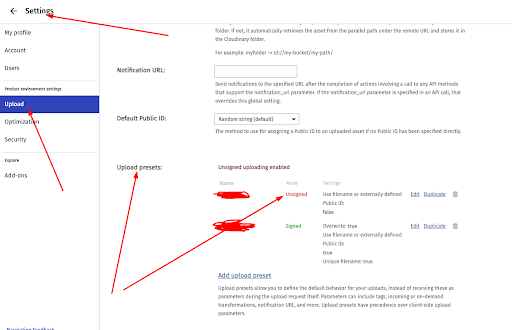
Get your upload preset
-
This video for google client id, watch for only creating a
project on google developer console from
18.28 sec.
Google Client ID
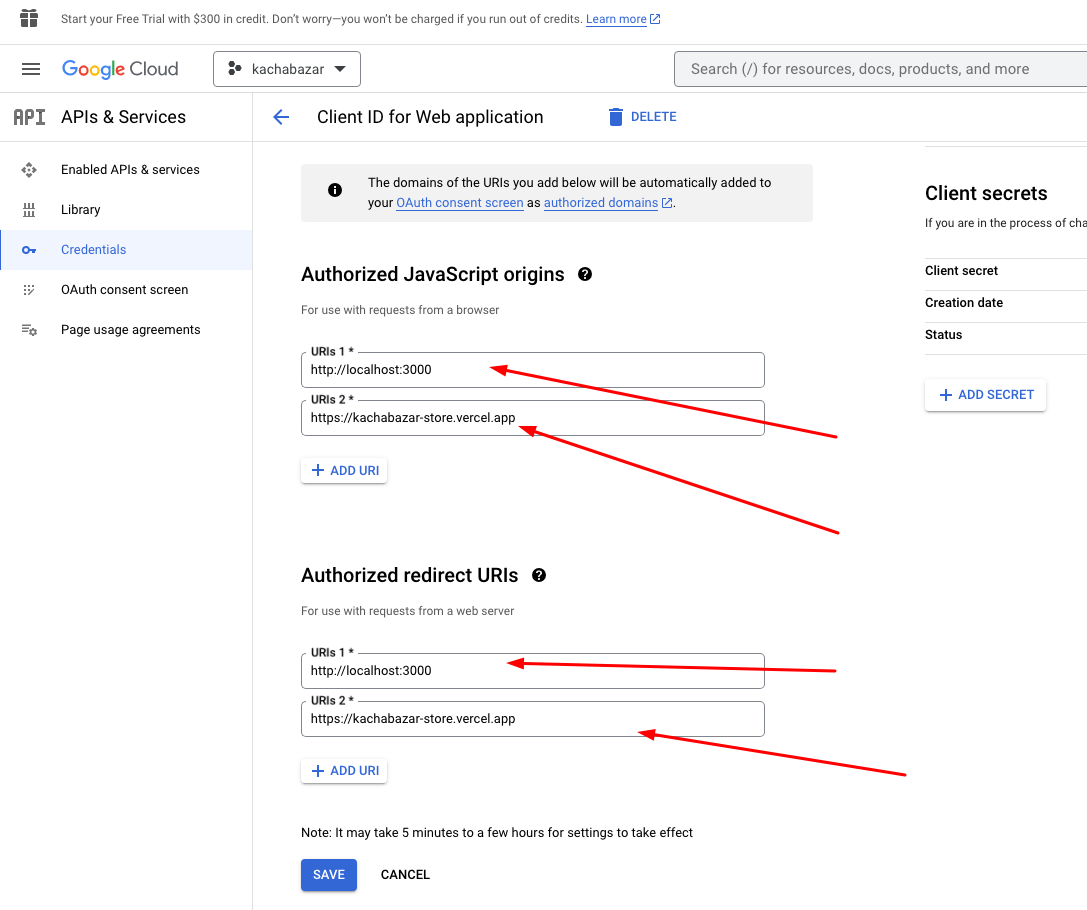
(For google sign in), your google developer console api &
services Creadientals will look like this.
- Also need a stripe API key, for using the stripe payment option. If you want this, then go to react-stripe and create an account, get your test stripe API key, and put that on the .env.local variable. But if you do not add this value on the .env.local file then stripe will not work, others will work fine.
After configuration you .env.local file will look like this
NEXT_PUBLIC_STRIPE_KEY="your stripe key" //for use stripe, change with your stripe API key
NEXT_PUBLIC_API_BASE_URL=http://localhost:5055/api //base API URL, when run on localhost/dev server.
NEXT_PUBLIC_API_SOCKET_URL=http://localhost:5055 //base API SOCKET URL, when run on localhost/dev server.
NEXT_PUBLIC_CLOUDINARY_URL=https://api.cloudinary.com/v1_1/your-cloudinary-user-name/image/upload
NEXT_PUBLIC_CLOUDINARY_UPLOAD_PRESET=fg1vfge //your cloudinary upload preset
NEXT_PUBLIC_GOOGLE_CLIENT_ID=your_google_client_id
Running the Store
Now run npm run dev to start your
backend on the local server with
store.
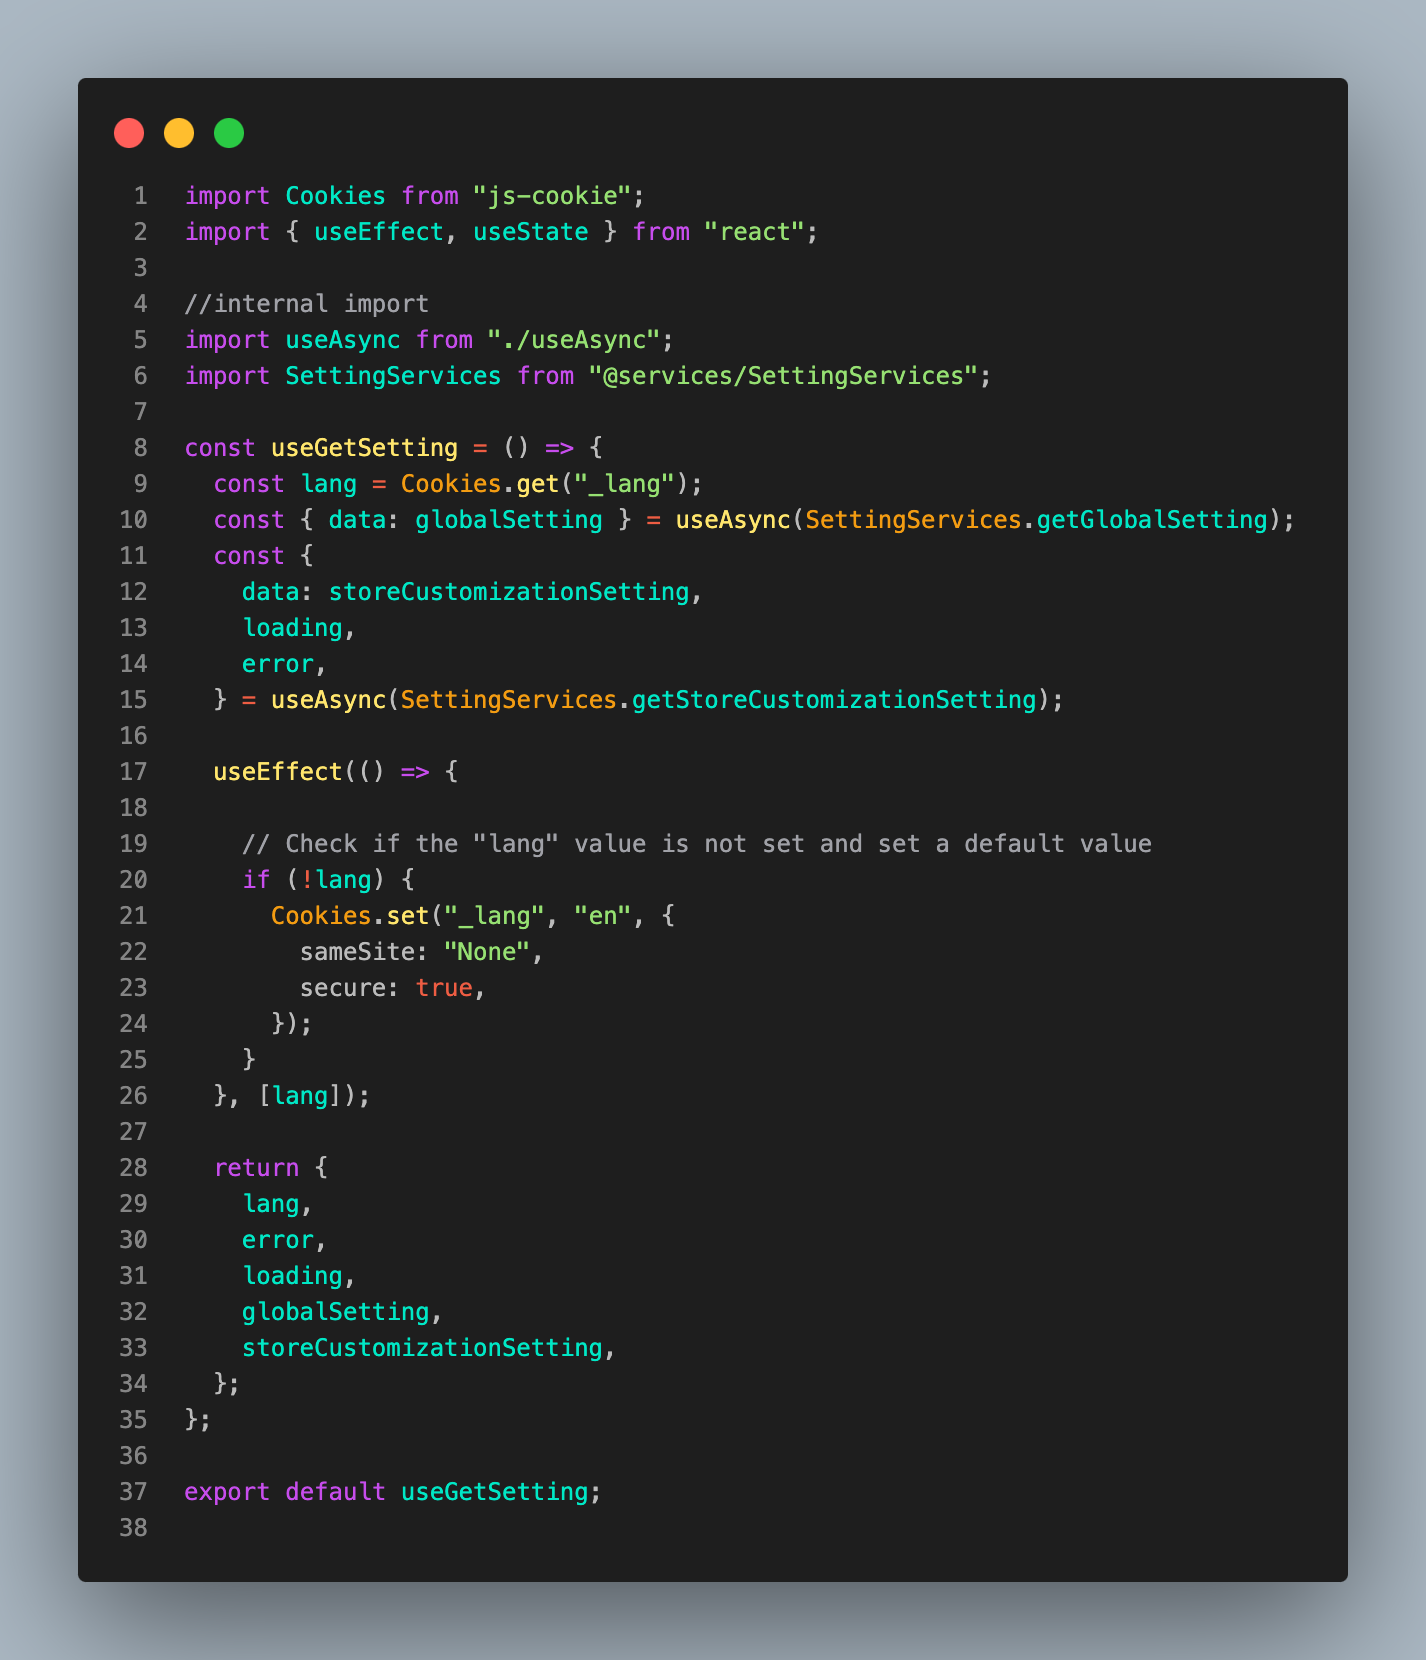
Note: in store all store customization data showing dynamically from admin, also store customization data and global setting data are stored on session storage by redux as those data will not update frequently. So, whenever those data update in admin, please just open store url in new tab, then you will get updated store. And if you want to fetch data from backend on every load then you can update your store like bellow
Installation
As you already installed Node on you machine, so no need to re-install again, Just check you installed properly by node --version
NPM Packages:
- After downloading the template, unzip it
- Open the VS Code Terminal/System Terminal
- Go to the folder (admin): (cd path/to/template)
- Run: npm install, it will install all used packages for this admin.
- Make sure that there is no error.
-
Rename
.env.exampleto.env.local -
Please watch this video for Cloudinary configuration
Cloudinary configuration,
doc
(We used Cloudinary for profile image upload).
Get your cloud_name,api_key and api_secret
Get your upload preset
After configuration you .env.local file will look like this
    VITE_APP_API_BASE_URL=http://localhost:5055/api
    VITE_APP_API_BASE_URL=http://localhost:5055
    VITE_APP_STORE_DOMAIN=http://localhost:3000


    VITE_APP_CLOUD_NAME=you cloud name
    VITE_APP_CLOUDINARY_API_KEY=your cloudinary api key
    VITE_APP_CLOUDINARY_API_SECRET=api secret
    VITE_APP_CLOUDINARY_UPLOAD_PRESET=upload preset
    VITE_APP_CLOUDINARY_URL=https://api.cloudinary.com/v1_1/you_cloud_name/image/upload
Running the Admin
Now run npm run dev to start your
backend on the local server with
admin.
Getting Google Analytics Measurement ID
Go to the Google Analytics website Google Analytics to Create a new property for your website with adding necessary information. Then you will get the Google Measurement ID, which you will need to use in store setting for active google analytics.
Getting Tawk Chat Keys
Go to the Tawk to website Tawk Chat to Create a new account. Then you will get the Property ID from setting and Widget ID from channel Chat Widget. Use that in your store setting to active live chat in your store.
Run On Local server
To run on local server,
first you will need to configure
backend, store, and
admin.
After properly configuration open the root folder on
VS code or any other code editor. split the
Terminal by clicking on [|] button and make into
three, then go to admin, store and
backend by cd folder_name.
And finally run npm run dev for
backend, admin and
store.
Then admin will run on http://localhost:4100/,
store will http://localhost:3000/,
and backend will http://localhost:5055 and your
specified PORT.
Run On Live server
As a next.js project vercel is recommended for deployment because If you deploy on vercel then it will automatically do everything for us and there will be no need for customization.
Here is simple guide for deploying backend, store and admin on vercel:
- Create a GitHub account, go to Vercel and sign up with that GitHub account.
- Create three private repositories on GitHub, then push your backend code in one and store code in one, and admin code in another repository.
- Watch this video deploy on vercel, do according to.
-
When you import your GitHub repository on vercel by creating a
project, you will see an option for Environment Variables, just
click on that and give you a local .env all
variable with the value. then click on deploy.
Note first you will need to import and deploy backend, so that you can use that backend live url as store (NEXT_PUBLIC_API_BASE_URL) and admin(VITE_APP_API_BASE_URL) .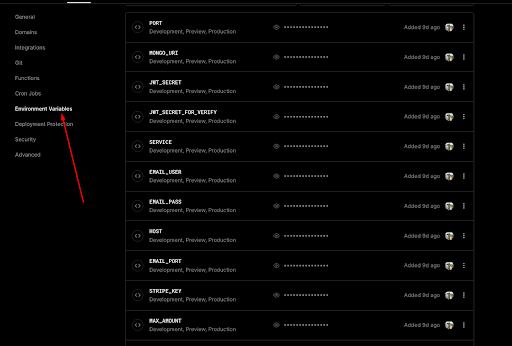
- After the backend is deployed successfully, you will find a URL for your API route that will like this https://kachabazar.vercel.app/, and now change that like this https://kachabazar.vercel.app/api, or https://kachabazar.vercel.app/api/products, to see the products imported or not and use this as a NEXT_PUBLIC_API_BASE_URL and VITE_APP_API_BASE_URL when you deploy your store and admin project.
- Now create another two projects for store and admin. Deploy one by one same as backend project and put all .env.local variable On Environment Variables section before clicking on deploy button, then click deploy, it will take some time for build and after that build, you will see you live version of store and admin.
- If you do accordingly, then everything will be okay, for now when you make any changes on your local file, you just need to push your code on GitHub, vercel will automatically detect those changes and will redeploy your project with updated features.
You will find many videos on youtube and also articles on google about how to deploy next.js and express apps on vercel.
Change Logo
- Login to the system as Admin
- https://yourdomain.com/dashboard
- Go to Appearance > Header
- Update the field with your changes
- Click Save Changes

Configure Homepage
Here you can configure all the sections of homepage of the website
- Login to the system as Admin
- https://yourdomain.com/dashboard
- Go to Appearance > Homepage
- Update the field with your changes

Change Admin Logo
- Login to the system as Admin
- https://yourdomain.com/dashboard
- Go to System Settings > General Settings
- Update the field with your changes
- Click Save Changes

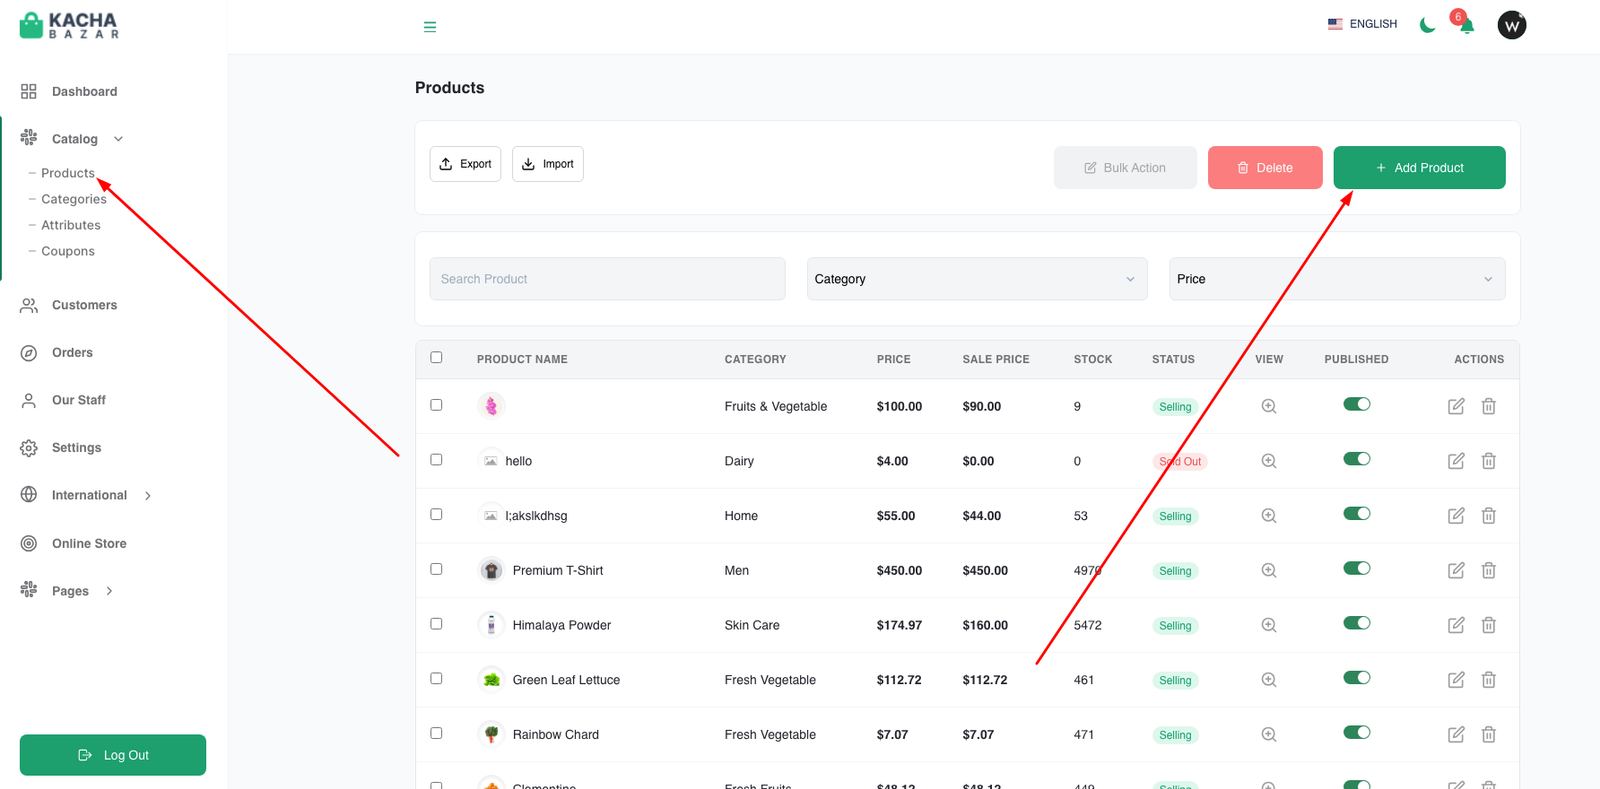
Product CRUD (Create, Read, Update, Delete)
You can add with and without Combination product from here with all necessary information. Also you can import and export bulk product data from here. When you adding product select the language from Select option on drawer right corner for adding your preferred language. And you can update this data according your need.
- Login to the system as Admin
- Go to Catalog tab > Product
- Open the drawer by clicking add product button
- Then fill the information and save
- To Edit Product click on Edit Icon
- To Delete Product click on Delete Icon
- To Bulk action click on Bulk action button
- To export different format by clicking on export button
- To import different format by clicking on import button
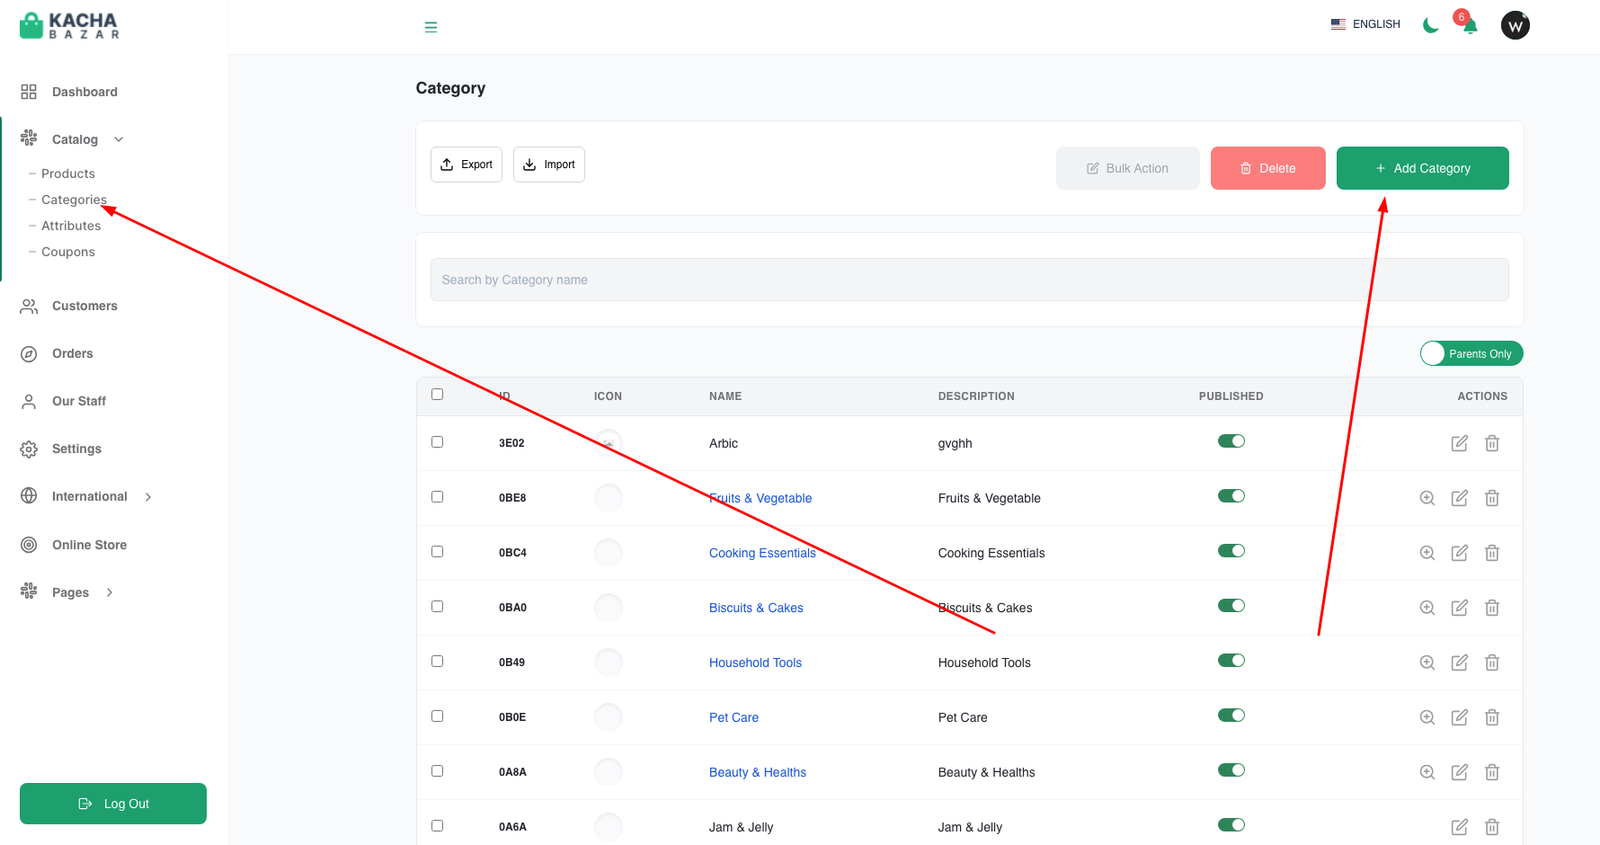
Category CRUD (Create, Read, Update, Delete)
You can add multi-level parent category and child-category from here with all necessary information. Also you can import and export bulk data from here. When you adding product select the language from Select option on drawer right corner for adding your preferred language. And you can update this data according your need.
- Login to the system as Admin
- Go to Catalog tab > Category
- Open the drawer by clicking add category button
- Then fill the information and save
- To Edit Category click on Edit Icon
- To Delete Category click on Delete Icon
- To Bulk action click on Bulk action button
- To export different format by clicking on export button
- To import different format by clicking on import button
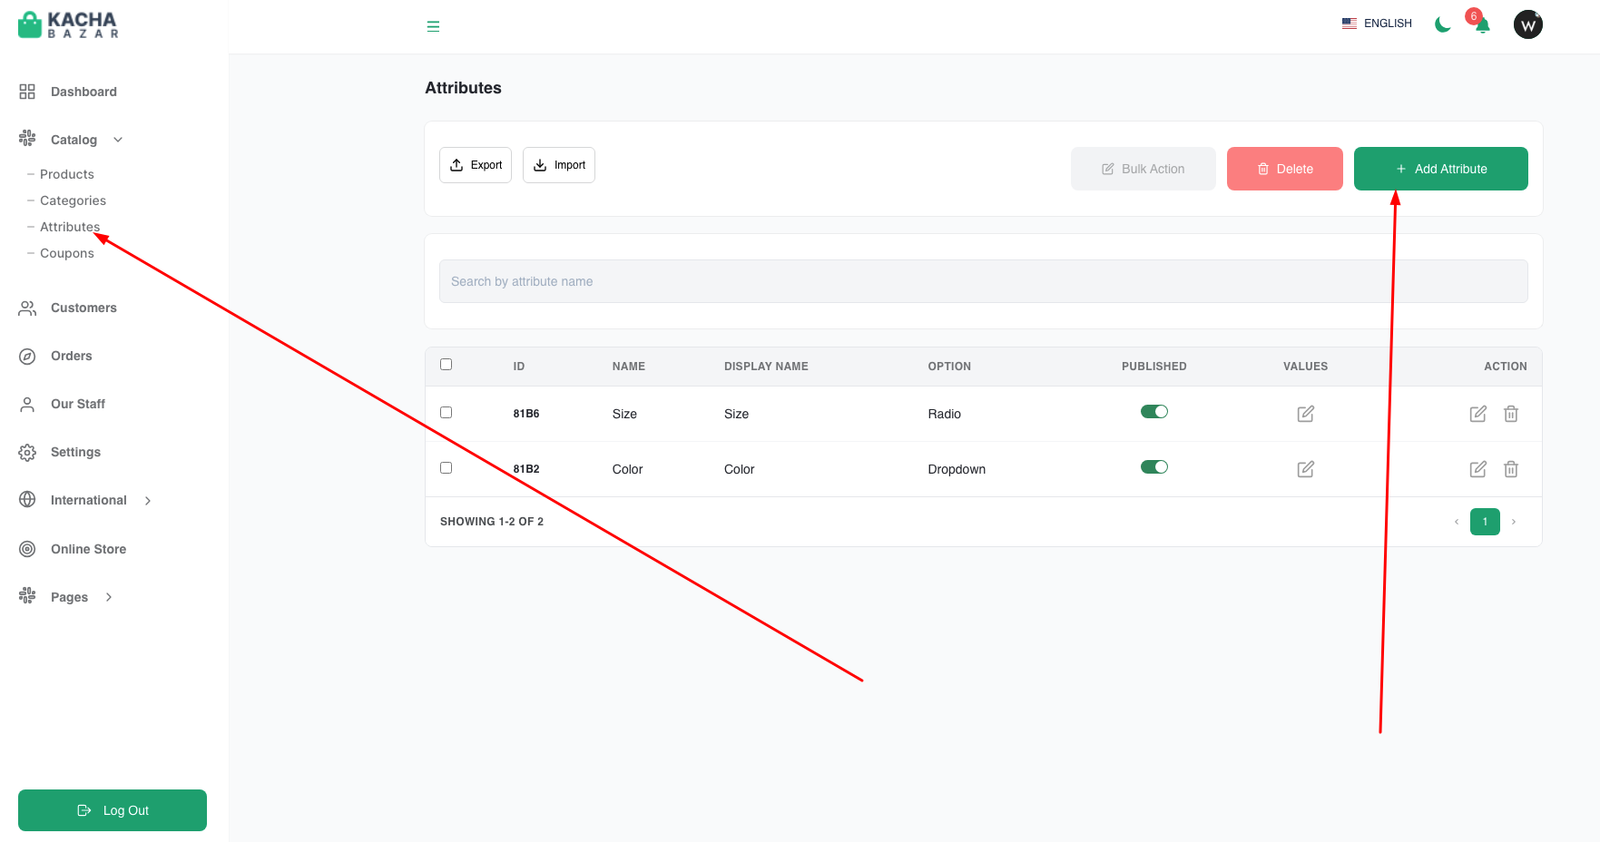
Attribute CRUD (Create, Read, Update, Delete)
You can add attribute from here with all necessary information. Also you can import and export bulk data from here. When you adding product select the language from Select option on drawer right corner for adding your preferred language. And you can update this data according your need.
- Login to the system as Admin
- Go to Catalog tab > Attribute
- Open the drawer by clicking add attribute button
- Then fill the information and save
- To Edit Attribute click on Edit Icon
- To Delete Attribute click on Delete Icon
- To Bulk action click on Bulk action button
- To export different format by clicking on export button
- To import different format by clicking on import button
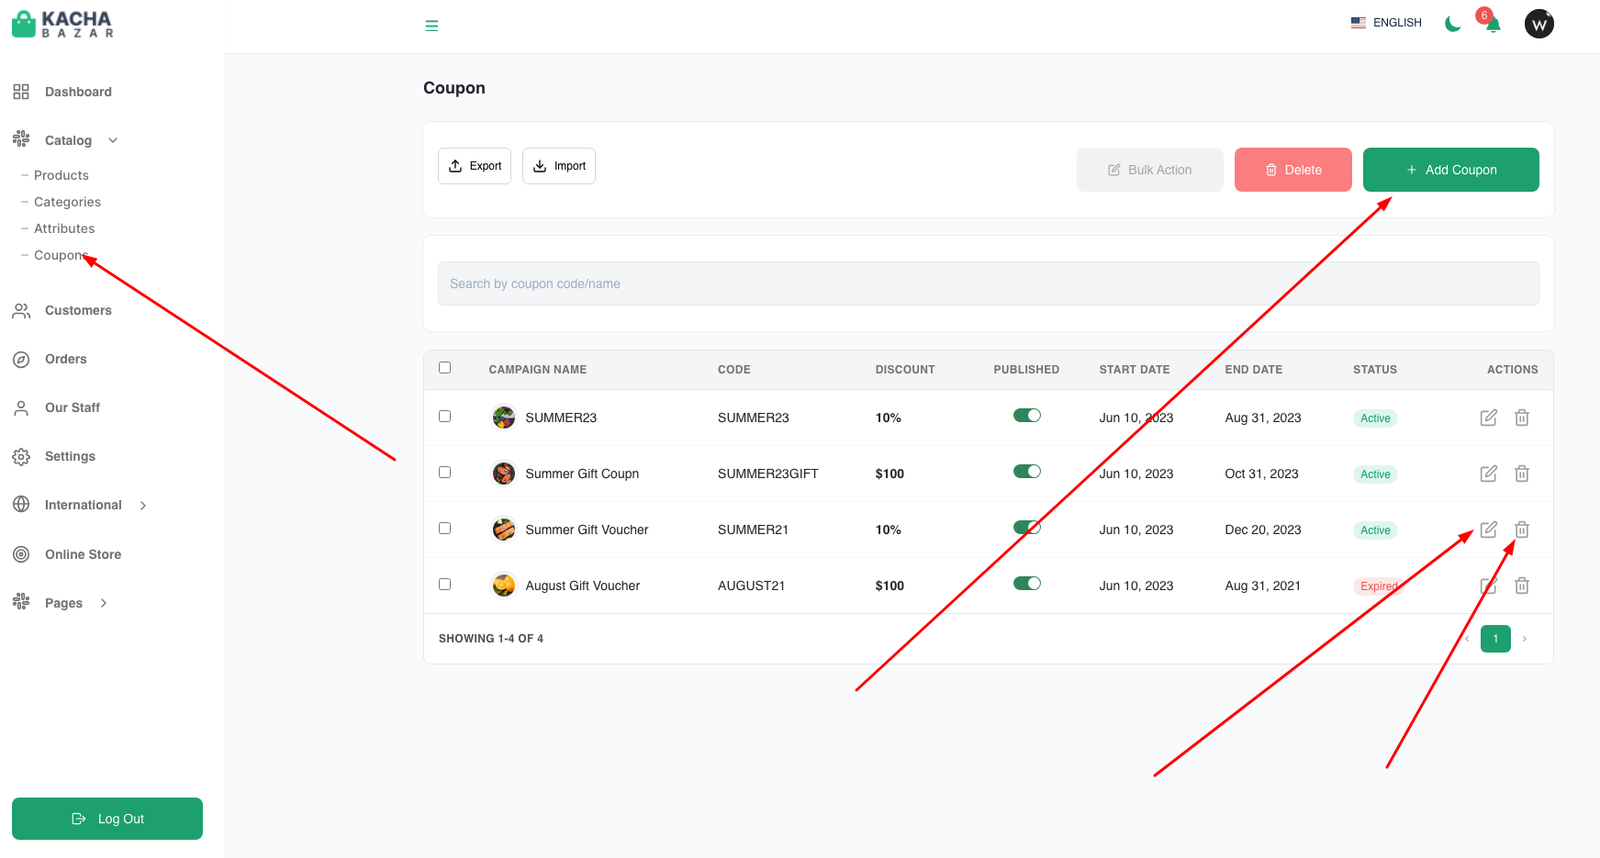
Coupon CRUD (Create, Read, Update, Delete)
You can add coupon from here with all necessary information. Also you can import and export bulk data from here. When you adding product select the language from Select option on drawer right corner for adding your preferred language. And you can update this data according your need.
- Login to the system as Admin
- Go to Catalog tab > Coupon
- Open the drawer by clicking add coupon button
- Then fill the information and save
- To Edit Coupon click on Edit Icon
- To Delete Coupon click on Delete Icon
- To Bulk action click on Bulk action button
- To export different format by clicking on export button
- To import different format by clicking on import button
Language CRUD (Create, Read, Update, Delete)
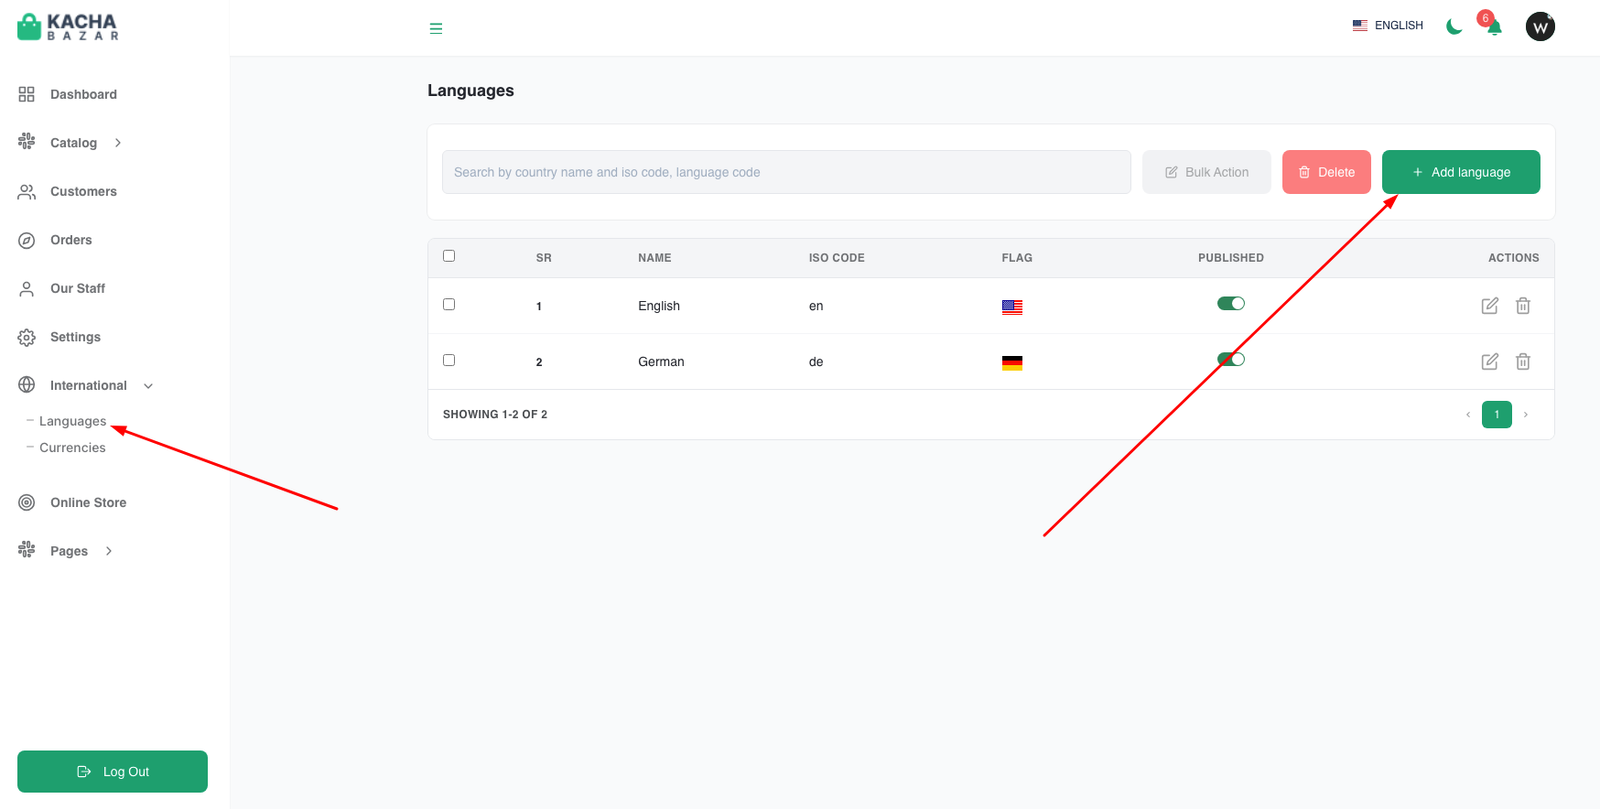
You can add language from here with all necessary information. This language will show in store language select drop-down, also in all dynamic data adding drawer.
- Login to the system as Admin
- Go to Catalog tab > Language
- Open the drawer by clicking add language button
- Then fill the information and save
- To Edit Language click on Edit Icon
- To Delete Language click on Delete Icon
- To Bulk action click on Bulk action button
Currency CRUD (Create, Read, Update, Delete)
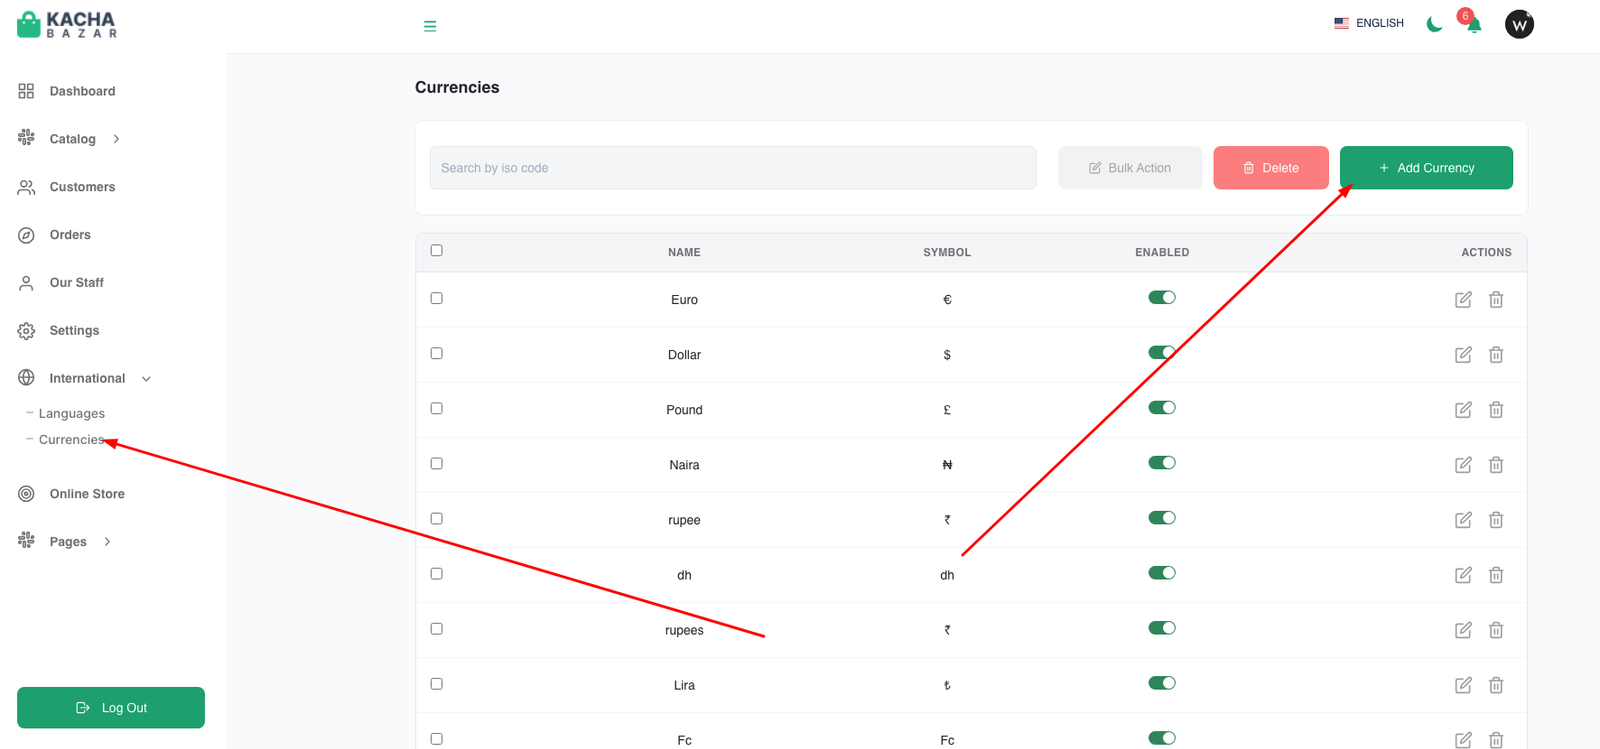
You can add currency from here with all necessary information. This currency will shown in setting currency select option.
- Login to the system as Admin
- Go to Catalog tab > Currency
- Open the drawer by clicking add currency button
- Then fill the information and save
- To Edit Currency click on Edit Icon
- To Delete Currency click on Delete Icon
- To Bulk action click on Bulk action button
Add Setting
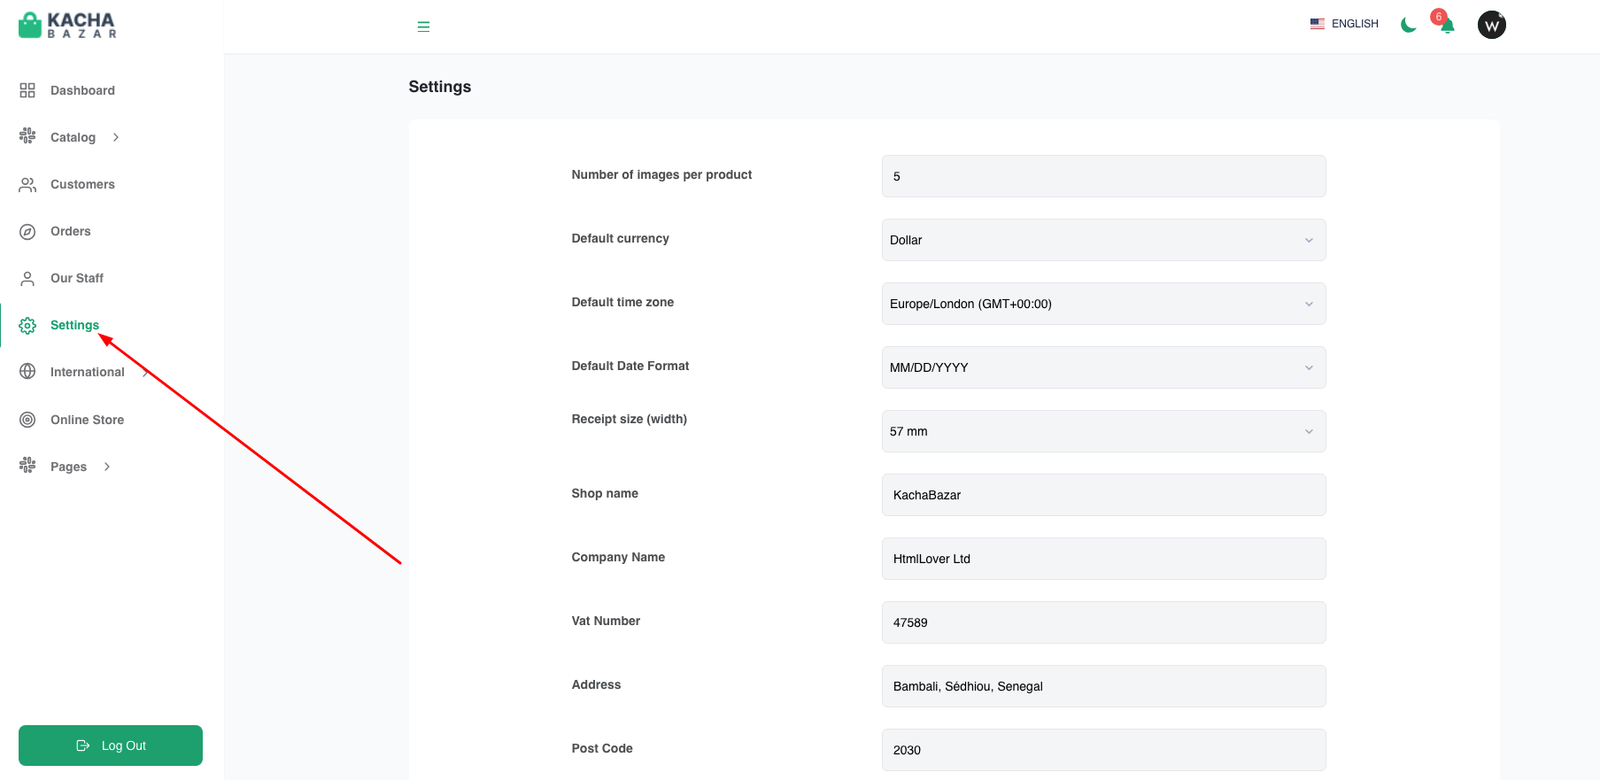
You can add setting from here with all necessary information. all setting data will apply in admin and store. like currency, data format, time zone. And other information will shown in customer order invoice.
- Login to the system as Admin
- Go to Setting tab
- Then fill the information and save
Edit Profile
You can update admin/staff info from here with all necessary information. Also can be update from staff drawer.
- Login to the system as Admin
- Go to Catalog tab > Edit Profile
- Then fill the information and save